Chef notes
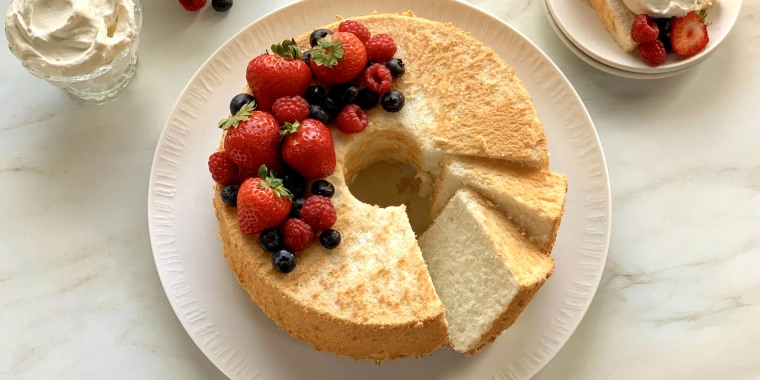
With its iconic shape, golden brown exterior, plush texture and snow white crumb, angel food cake is perhaps the most understated cake there is. Absolutely scrumptious on its own and even better topped with whipped cream and fresh fruit, this light-as-air, just-sweet-enough sponge cake does it all. While it's readily available at practically any grocery store, a classic angel food cake is that much better when homemade. Using just seven ingredients and some thoughtful techniques, this cake is much easier than meets the eye.
Let’s first talk about sugar. I opt for a combination of granulated and confectioners sugar in this recipe. The granulated sugar (enough to do what is needed, but not so much as to make the cake grainy) is streamed into the egg whites in the first stage of whipping to stabilize the meringue, as well as provide moisture and sweetness to the cake. The confectioners’ sugar is sifted with cake flour and salt and folded into the meringue. Confectioners’ sugar provides sweetness while the added cornstarch absorbs some of the free water from the egg whites, helping to further limit gluten development and yield a tender and plush cake.
Angel food cake gets its lift from aerated egg whites rather than chemical leaveners, such as baking soda or powder. Because of this, it’s super important to make sure your meringue is voluminous, but not too stiff. Adding cream of tartar to the egg whites helps to create a stable meringue. The real trick, however, comes from whipping the meringue stages, with the speed increasing with each stage. The egg whites transform from liquid to a “network” of miniscule bubbles that get teenier with each stage.These microscopic bubbles, in turn, yield a stronger, more stable meringue. It’s important to not over-whip the meringue. When whipped to stiff peaks, the meringue has essentially taken on all the volume it can hold. Once it hits the heat of the oven, it cannot expand anymore and the cake will collapse. By whipping the meringue only to medium-stiff peaks, you allow room for the whites to expand in the oven, creating a tall, springy angel food cake.
The last keys to success lie in sifting, the pan you use and the way you cool the cake. For this, I found it best to first sift the confectioners’ sugar, flour, and salt into a bowl, then sift it again in stages over the meringue. Sifting the mixture again over the meringue in stages helps to keep the meringue from collapsing and makes incorporating the dry ingredients easier.
This recipe works best in an ungreased, unlined angel food cake pan that is not nonstick so that the batter can climb up and cling to the walls of the pan as it bakes, creating a lofty cake.
Cooling the cake upside down prevents the cake from collapsing in on itself as it cools and is the key to maintaining all that aeration and lift you worked so hard to get.
Technique Tip: Take great care when separating the egg whites as even a drop of fat (from the yolk) will prevent the whites from whipping up to their full potential. Moreover, make sure your mixing bowl is very clean.
Do not whip the meringue to full stiff peaks as this can result in visual issues (volume loss and problems browning) as well as textural issues.
Oftentimes, the exposed top of the cake will take on color before the sides and bottom (concealed by the pan). Along with the visual cues in the recipe, you can check for the cake's doneness by using a digital thermometer to check its internal temperature. For this recipe, I found the sweet spot to be about 213 F.
Swap Option: I prefer to use a 10-inch angel food cake pan that is footed and has a removable bottom, as this makes it much easier to cool and unmold. If you do not have a footed pan, you can cool the cake upside down in its pan with the center tube set over a heatproof bottle to allow air flow under the cake.
Ingredients
- 1¼ cups confectioners’ sugar
- 1 cup bleached cake flour
- 1/2 teaspoon kosher salt
- 12 large egg whites, room temperature
- 1 teaspoon cream of tartar
- 2/3 cup granulated sugar
- 1¾ teaspoons pure vanilla extract
- whipped cream, for serving (optional)
- fresh berries, for serving (optional)
Preparation
1.Arrange a rack in the center of the oven and preheat the oven to 350 F.
2.Using a fine mesh sifter, sift the confectioners’ sugar, cake flour and kosher salt in a medium bowl. Set aside.
3.In the bowl of a stand mixer fitted with the whisk attachment, add the egg whites and cream of tartar. Increase the mixer speed to medium-low and slowly stream in the granulated sugar over the course of 1 minute. Continue to whip until the whites are very foamy and growing in volume, about 2 minutes more.
4.Increase the speed to medium and continue to whip until the egg whites are opaque and just nearing soft peaks, about 3 minutes. The meringue should have body, but fall off the whisk and pool back into the rest of the mixture.
5.Increase the speed to medium-high and whip to medium-stiff peaks, about 1 minute. The meringue should be glossy and shiny and hold a peak with the tip flopping over slightly.
6.Add the vanilla and whip on medium-low until just incorporated, 10 to 15 seconds. Do not whip to stiff peaks.
7.Remove the bowl from the stand mixer. Sift half of the flour mixture over the meringue and use a rubber spatula to fold until just about fully combined. Sift the remaining half of the flour mixture over the meringue mixture and fold until fully combined with no dry spots or pockets of flour remaining.
8.Scrape the batter into an ungreased, unlined 10-inch footed angel food cake pan with a removable bottom. Lightly smooth the top with the rubber spatula.
9.Bake for 45 to 50 minutes or until golden brown, the top springs back when gently poked, and a skewer or cake tester comes out clean.
10.Cool the cake completely upside down on its feet set over a wire rack, at least 2½ hours.
11. Once cooled, flip the cake over. Run a small offset spatula or paring knife around the outside of the cake and the center ring. Remove the outer ring of the pan. Slide the offset or paring knife between the bottom piece of the pan and the cake. Flip onto a serving platter.
Serve with whipped cream and berries as desired.
