Chef notes
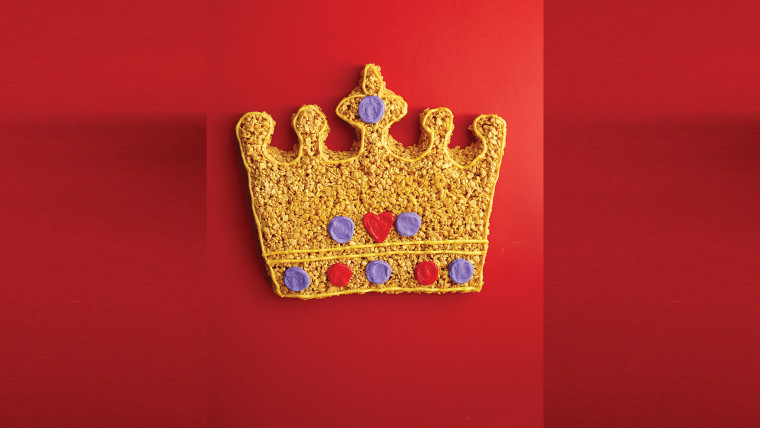
Give rice cereal treats the royal treatment with this impressive dessert that's fit for a king or queen.
Special equipment: Crown template, parchment paper, piping bags and a round icing tip.
Ingredients
- 4 tablespoons butter
- 6 cups mini marshmallows
- 9 drops yellow food coloring
- 1 drop brown food coloring
- 8 cups crispy rice cereal
- Gold food spray, preferably Wilton
- Yellow icing
- Purple icing
- Red icing
Preparation
1.Lay the template out on your work surface and cover it with parchment paper.
2.In a large pot, melt butter over low heat until it's 80 percent melted. If the butter begins to sizzle, lower the heat. It should melt very slowly.
3.Add the mini marshmallows and stir gently, coating them with melted butter, about 30 seconds.
4.When marshmallows are about 80 percent melted (when you still can see the individual marshmallow shapes but they are beginning to run together), add the food coloring. Stir for another 15 seconds and then turn off the heat.
5.Stir gently until the color is well distributed but the marshmallows are still only about 80 percent melted, about 35 seconds (you should still be able to identify individual pieces within the melted ones). If the marshmallows melt too much, the mixture will be too hot to handle wait 1-2 minutes and then mold quickly!
6.Add the cereal and mix well, until the marshmallows and cereal are fully combined, about 40 seconds. Do not overmix!
7.Once the mixture is combined, coat the palms of your hands with cooking spray before handling it. Pour the mixture onto your work surface and begin molding it with your hands. Spray your hands again throughout the process, as needed.
8.Pour mixture onto the parchment-covered template. Mold the mixture over the template, smoothing edges until the mixture begins to firm up.
9.Using yellow icing, in a piping bag fitted with a round tip, draw an outline along the outer edge of the crown shape.
10.Draw two horizontal, parallel lines about 1½ inches from the crown's base.
11.Use the gold food spray to coat the entire treat, including the icing lines.
12.Using purple and red icings in piping bags fitted with round tips, draw decorative dots and hearts.
13.Wait 10 minutes, then use your fingers to pat the purple and red icing shapes to smooth them.
